July 28, 2026
How to Compress Images Without Losing Quality (2026 Guide)
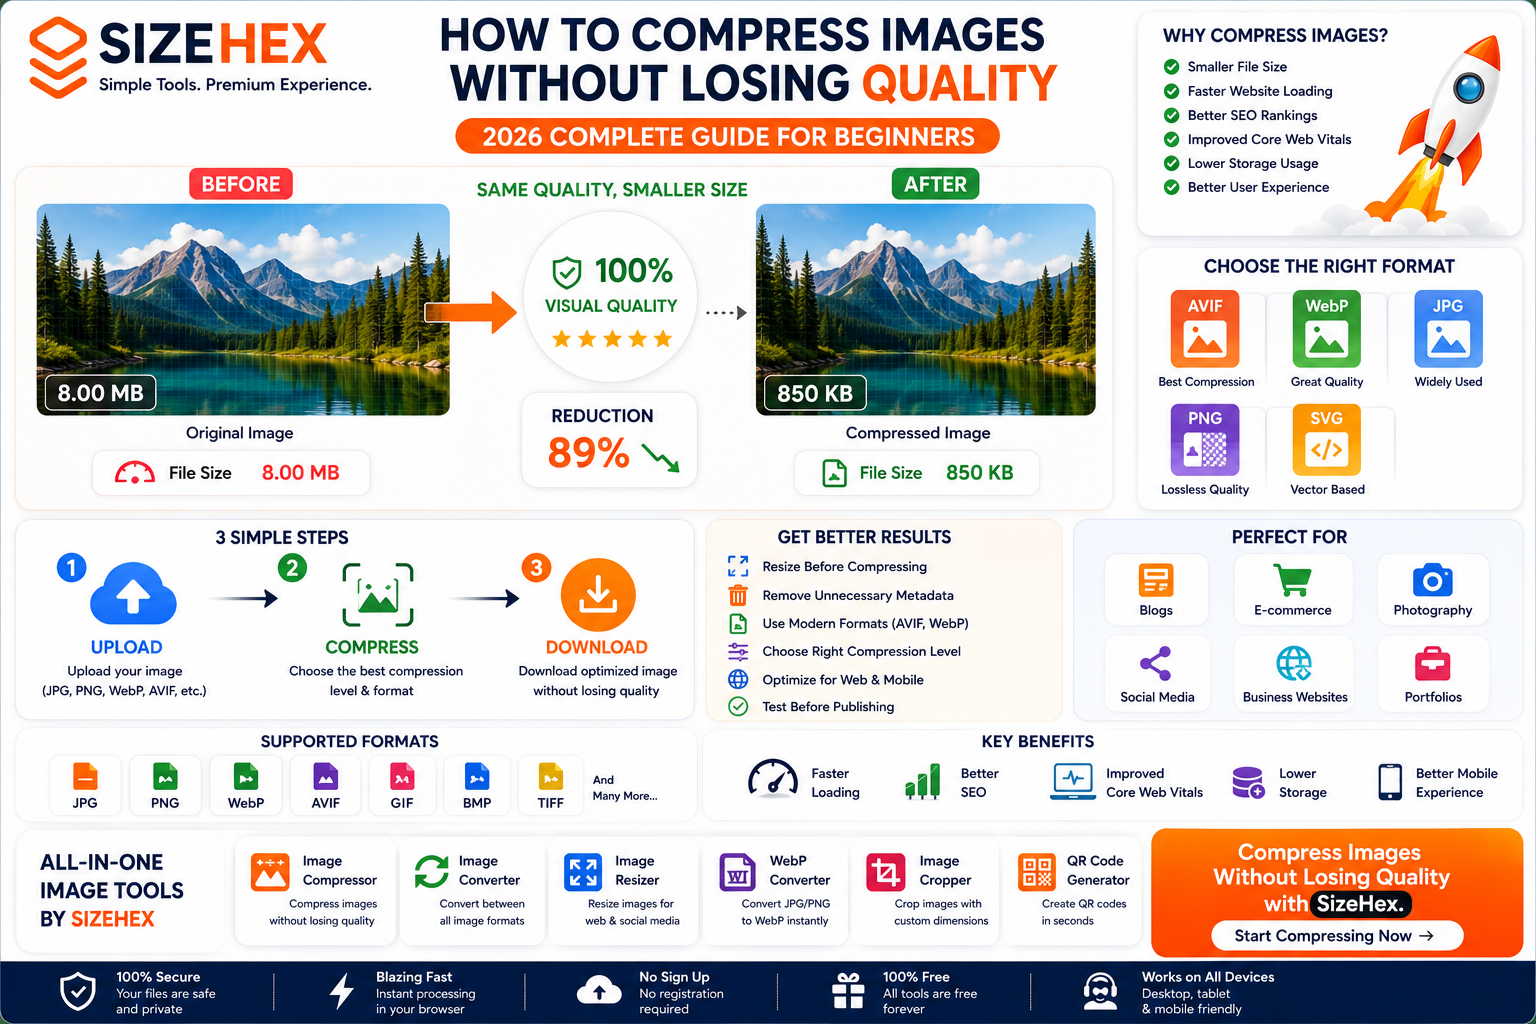
How to Compress Images Without Losing Quality
High-quality images make websites, blogs, online stores, and social media posts more attractive and engaging. However, large image files can slow down your website, increase storage requirements, and consume more bandwidth. This is especially important for websites where loading speed directly affects user experience and search engine optimization (SEO).
Fortunately, you don't always have to sacrifice image quality to reduce file size.
With modern image formats, intelligent compression algorithms, and proper optimization techniques, you can significantly reduce image file sizes while maintaining excellent visual quality. In many cases, visitors won't notice any visible difference between the original and the optimized image.
Whether you're a blogger, web developer, designer, photographer, student, or business owner, learning how to compress images properly can help you create faster websites, improve Core Web Vitals, reduce hosting costs, and deliver a better browsing experience.
In this guide, you'll learn exactly how to compress images without noticeable quality loss, understand the difference between lossy and lossless compression, and discover best practices for optimizing images for websites and digital projects.
What Does "Compress Without Losing Quality" Mean?
When people say they want to compress an image without losing quality, they usually mean reducing the file size while keeping the image looking the same to the human eye.
There are two ways this can happen:
- Lossless Compression – The image data remains intact, and quality is preserved exactly.
- Efficient Lossy Compression – Some data is removed, but the visual difference is so small that most viewers won't notice it.
For example:
| Original Image | Optimized Image |
|---|---|
| 6.5 MB | 850 KB |
Although the optimized image is much smaller, it can still appear virtually identical when viewed on a website or mobile device.
The key is choosing the right format and compression level for the image's purpose.
Why Image Compression Is Important
Every image on a webpage adds to the total amount of data a visitor's browser must download.
Large images can negatively affect:
- Website loading speed
- Mobile performance
- Core Web Vitals
- User experience
- Storage usage
- Bandwidth consumption
- SEO performance
Compressed images help solve these problems while maintaining professional-looking visuals.
Benefits include:
- Faster page loading
- Better PageSpeed Insights scores
- Lower bounce rates
- Improved mobile experience
- Reduced hosting costs
- Faster uploads
- Better search engine performance
For image-heavy websites such as blogs, e-commerce stores, news portals, and portfolios, compression is one of the most impactful performance optimizations.
Can You Really Compress Images Without Quality Loss?
Yes—but the answer depends on the compression method you use.
Lossless Compression
Lossless compression removes unnecessary data without changing any image pixels.
Advantages:
- Original quality preserved
- Perfect for editing
- Ideal for graphics
- Great for screenshots
Formats:
- PNG
- TIFF
- WebP (Lossless)
- AVIF (Lossless)
Efficient Lossy Compression
Lossy compression removes some image information that is difficult for the human eye to detect.
Modern formats such as AVIF and WebP use advanced compression algorithms, allowing images to become much smaller while maintaining excellent visual quality.
In many cases, users cannot distinguish the optimized image from the original during normal viewing.
Lossy vs Lossless Compression
Understanding the difference helps you choose the best method for each project.
| Feature | Lossy Compression | Lossless Compression |
|---|---|---|
| File Size Reduction | ⭐⭐⭐⭐⭐ | ⭐⭐⭐☆☆ |
| Visual Quality | Slightly Reduced | Original Quality |
| Data Removed | Yes | No |
| Website Speed | Excellent | Good |
| Editing | Not Ideal | Excellent |
| Best For | Photos, Blogs, Websites | Logos, Graphics, Screenshots |
How Image Compression Works
Digital images are made up of millions of tiny pixels.
Each pixel stores information such as:
- Color
- Brightness
- Transparency
- Position
The more information an image contains, the larger its file size.
Compression works by reducing the amount of data required to store those pixels.
Depending on the method, compression may:
- Remove redundant image information
- Optimize color storage
- Eliminate unnecessary metadata
- Detect repeated patterns
- Encode data more efficiently
Modern image formats achieve impressive reductions while maintaining excellent visual quality.
Benefits of Compressing Images
Proper image compression offers advantages far beyond reducing storage space.
1. Faster Website Loading
Smaller image files download more quickly, improving the browsing experience for visitors on both desktop and mobile devices.
2. Better SEO
Search engines reward websites that provide a fast, user-friendly experience.
Compressed images contribute to:
- Better PageSpeed Insights scores
- Improved Core Web Vitals
- Faster crawling
- Better technical SEO
3. Lower Storage Requirements
Compressed images occupy less disk space, making them easier to store in cloud services, backups, and hosting environments.
4. Reduced Bandwidth Usage
Every visitor downloads fewer bytes, helping reduce bandwidth costs and improving performance on slower internet connections.
5. Faster Uploads
Smaller files upload much faster to:
- Websites
- Social media
- Cloud storage
- Content management systems
6. Better Mobile Experience
Many users access websites on smartphones using mobile data.
Compressed images:
- Load faster
- Consume less data
- Improve responsiveness
- Enhance the overall browsing experience
7. Improved User Engagement
Fast-loading pages encourage visitors to stay longer, explore more content, and interact with your website.
Common Mistakes When Compressing Images
Many people accidentally reduce image quality more than necessary.
Avoid these common mistakes.
Compressing Images Multiple Times
Each round of lossy compression removes additional image data.
Best Practice: Always keep an original copy and compress from the original file.
Choosing the Wrong Format
Using PNG for photographs often results in unnecessarily large files.
Better alternatives include:
- AVIF
- WebP
- JPG
Reserve PNG for screenshots, graphics, and transparency.
Compressing Too Aggressively
Extreme compression can create visible artifacts, blurry details, and poor color transitions.
Aim for the smallest file size that still looks visually sharp.
Uploading Large Original Images
Uploading a 5000 × 4000 image when it will only display at 1200 × 800 wastes bandwidth.
Resize images before compressing them.
Ignoring Metadata
Images often include unnecessary EXIF metadata such as:
- Camera model
- GPS location
- Date taken
- Lens information
Removing this metadata can reduce file size without affecting image quality.
Quick Comparison Table
| Feature | Lossless Compression | Efficient Lossy Compression |
|---|---|---|
| Quality | ⭐⭐⭐⭐⭐ | ⭐⭐⭐⭐☆ |
| File Size Reduction | ⭐⭐⭐☆☆ | ⭐⭐⭐⭐⭐ |
| Website Speed | ⭐⭐⭐⭐☆ | ⭐⭐⭐⭐⭐ |
| SEO Benefits | ⭐⭐⭐⭐☆ | ⭐⭐⭐⭐⭐ |
| Best For | Graphics, Logos, Screenshots | Photos, Blogs, E-commerce |
| Recommended Formats | PNG, SVG, TIFF | AVIF, WebP, JPG |
Key Takeaways
- Compressing images improves website speed, SEO, and user experience.
- Modern formats like AVIF and WebP provide excellent compression while maintaining high visual quality.
- Use lossless compression when preserving every pixel is essential.
- Use efficient lossy compression for photographs and website images to achieve the best balance between quality and performance.
- Always resize images and remove unnecessary metadata before publishing.
Step 1: Choose the Right Image Format
The first step in compressing an image without losing noticeable quality is selecting the right image format. Even before compression, the format you choose can significantly affect file size, loading speed, and visual quality.
Different formats are designed for different purposes.
Here's when to use each one.
AVIF
AVIF is currently one of the most efficient image formats for the web.
Advantages
- Extremely small file sizes
- Outstanding image quality
- HDR support
- Transparency support
- Excellent compression efficiency
Best For
- Blog images
- Hero banners
- Product photos
- Landing pages
- Portfolio websites
Not Ideal For
- Older software with limited AVIF support
🏆 Recommended Choice: Modern websites focused on speed and SEO.
WebP
WebP is widely supported and offers excellent compression while maintaining high image quality.
Advantages
- Smaller than JPG and PNG
- Supports transparency
- Supports animation
- Great browser compatibility
Best For
- Business websites
- Blogs
- E-commerce
- General website images
🏆 Recommended Choice: A versatile option for most websites.
JPG (JPEG)
JPG remains one of the most commonly used image formats for photographs.
Advantages
- Universal compatibility
- Small file sizes
- Fast loading
Best For
- Photography
- Social media
- Product photos
- Marketing images
Limitations
- No transparency
- Quality decreases with repeated lossy compression
PNG
PNG uses lossless compression and preserves every pixel.
Advantages
- Perfect image quality
- Transparency
- Sharp text
- Ideal for screenshots
Best For
- Logos
- Screenshots
- UI graphics
- Technical illustrations
Limitations
- Larger file sizes than AVIF or WebP for photographs
SVG
SVG stores graphics as vector data instead of pixels.
Advantages
- Infinitely scalable
- Tiny file sizes for simple graphics
- Perfect for responsive design
Best For
- Logos
- Icons
- Charts
- Illustrations
Not Suitable For
- Photographs
Quick Format Comparison
Format Compression File Size Quality Best Use AVIF Lossy/Lossless ⭐⭐⭐⭐⭐ ⭐⭐⭐⭐⭐ Hero images, blogs, product photos WebP Lossy/Lossless ⭐⭐⭐⭐☆ ⭐⭐⭐⭐☆ General website images JPG Lossy ⭐⭐⭐☆☆ ⭐⭐⭐⭐☆ Photography PNG Lossless ⭐⭐☆☆☆ ⭐⭐⭐⭐⭐ Screenshots, graphics SVG Vector ⭐⭐⭐⭐⭐ Infinite Logos, icons Step 2: Resize Images Before Compressing
One of the biggest mistakes people make is compressing oversized images.
Imagine uploading a 5000 × 3500 px image when your website only displays it at 1200 × 840 px. Even if the image is compressed, visitors still download unnecessary pixels.
Why Resizing First Matters
Resizing:
- Reduces file size dramatically
- Speeds up page loading
- Saves bandwidth
- Improves mobile performance
- Makes compression more effective
Example
Original Resized 5000 × 3500 px 1200 × 840 px 8.2 MB 1.4 MB (before compression) After compression, the same image might be reduced to 300–500 KB with little visible quality difference.
Recommended Widths
Use Case Recommended Width Blog Featured Image 1200 px Hero Banner 1600–1920 px Product Image 1000–1500 px Thumbnail 300–600 px Social Media Platform-specific Step 3: Choose the Right Compression Level
Compression level has a direct impact on both image quality and file size.
The goal isn't to create the smallest file possible—it's to find the best balance between visual quality and performance.
Low Compression
- Excellent quality
- Larger file size
Best for:
- Photography portfolios
- Premium product images
Medium Compression
Recommended for most websites.
Benefits:
- Excellent visual quality
- Much smaller files
- Fast loading
Best for:
- Blogs
- Business websites
- E-commerce
- Marketing pages
High Compression
Produces the smallest files but may introduce visible artifacts.
Best for:
- Thumbnails
- Preview images
- Temporary graphics
Avoid using aggressive compression for important images where detail matters.
Step 4: Remove Unnecessary Metadata
Images often contain hidden information that increases file size without improving appearance.
Examples include:
- Camera model
- Lens information
- GPS location
- Date and time
- Editing software
- Copyright metadata
Removing unnecessary metadata can reduce file size while keeping the image visually identical.
Benefits
- Smaller files
- Faster uploads
- Better privacy
- Faster downloads
For most web images, keeping only essential metadata is sufficient.
Step 5: Use Modern Image Formats
Older formats like JPG and PNG remain useful, but modern formats are generally more efficient.
AVIF
Often provides the smallest file sizes with excellent image quality.
WebP
A strong balance between compatibility and compression efficiency.
Why Modern Formats Matter
Compared to traditional formats, they can:
- Reduce image size significantly
- Improve website performance
- Support faster loading
- Help optimize bandwidth usage
If your workflow supports them, modern formats are a smart choice for most web photographs.
Step 6: Optimize Images for Websites
Compression alone isn't enough.
For the best performance:
- Serve images at the correct display size.
- Use responsive images (
srcset) for different devices. - Enable lazy loading for below-the-fold images.
- Use descriptive filenames.
- Add meaningful alt text.
- Deliver images through a CDN if possible.
- Regularly review oversized images on your site.
Together, these practices improve loading speed and user experience.
Step 7: Compress Images Using SizeHex
With SizeHex, optimizing an image takes only a few steps.
Step 1
Upload your image.
Supported formats include:
- JPG
- PNG
- WebP
- AVIF
- GIF
- BMP
- TIFF
Step 2
Choose your preferred compression level.
For most websites, a balanced setting offers an excellent mix of quality and file size.
Step 3
Compress the image.
The optimization process reduces unnecessary data while preserving visual quality as much as possible.
Step 4
Preview the optimized result.
Compare:
- File size
- Image quality
- Resolution
If you're satisfied, download the optimized version.
Recommended Compression Settings
Blogs
Format: AVIF or WebP
Compression: Medium
Goal: Fast loading with excellent visual quality.
E-commerce
Format: AVIF
Compression: Medium
Product images should look sharp while loading quickly.
Photography
Format: AVIF or JPG
Compression: Low to Medium
Preserve fine details while reducing file size.
Social Media
Format: JPG or WebP
Compression: Medium
Most social platforms apply additional compression after upload.
Business Websites
Format: AVIF or WebP
Compression: Medium
Provides a professional appearance with excellent performance.
Image Compression Best Practices
Compressing images is only one part of image optimization. Following a few best practices can help you maintain excellent image quality while keeping your website fast and SEO-friendly.
1. Choose the Right Format
Different image formats serve different purposes.
Image Type Recommended Format Photography AVIF Blog Images AVIF / WebP Product Images AVIF Logos SVG Icons SVG Screenshots PNG Graphics with Transparency PNG Choosing the right format before compression produces better results than simply compressing the wrong format.
2. Resize Before Compressing
Never upload a huge image if it will only appear in a much smaller size.
Example:
Original Image
- 5000 × 3500 px
- 8 MB
Website Display
- 1200 × 840 px
Resizing first dramatically reduces file size before compression even begins.
3. Don't Overcompress
Extreme compression can cause:
- Blurry images
- Color banding
- Compression artifacts
- Poor user experience
Aim for the smallest file size that still looks visually excellent.
4. Keep Original Files
Always save the original image.
Benefits:
- Edit anytime
- Export different sizes
- Create social media versions
- Produce print-quality copies
Never overwrite your master file.
5. Remove Unnecessary Metadata
Photos often contain hidden information:
- GPS coordinates
- Camera model
- Lens information
- Copyright
- Editing history
Removing unnecessary metadata reduces file size without changing appearance.
6. Use Responsive Images
Different devices require different image sizes.
Responsive images help:
- Mobile phones download smaller images
- Tablets receive medium images
- Desktop users receive larger images
This improves performance while maintaining quality.
7. Enable Lazy Loading
Images below the visible area should load only when needed.
Benefits:
- Faster initial loading
- Better Core Web Vitals
- Lower bandwidth usage
- Improved PageSpeed Insights
8. Test Before Publishing
After compression, verify:
- Visual quality
- File size
- Resolution
- Mobile appearance
- Desktop appearance
A quick review helps ensure images still look professional.
Common Image Compression Mistakes
Even experienced website owners make mistakes that reduce quality or hurt performance.
Uploading Original Camera Images
Modern smartphones often produce images between 5 MB and 20 MB.
Uploading these directly slows your website.
Solution
Resize and compress before uploading.
Using PNG for Every Image
PNG is excellent for graphics but inefficient for photographs.
Better Choice
- AVIF
- WebP
- JPG
Compressing Multiple Times
Every lossy compression removes additional image data.
Instead:
Original Image
↓
Compress Once
↓
Publish
Avoid repeatedly editing and re-saving the compressed version.
Ignoring Image Dimensions
Large dimensions create unnecessary downloads.
Resize first.
Compress second.
Upload last.
Forgetting Alt Text
Compression improves speed.
Alt text improves:
- Accessibility
- Image SEO
- Google Image Search visibility
Always write meaningful alt text.
Using the Wrong Format
Example:
Photograph → PNG ❌
Better:
Photograph → AVIF ✅
Compressing Logos
Logos should never use heavy lossy compression.
Instead use:
- SVG
- PNG
Before Upload Checklist
Use this checklist before publishing any image.
✅ Correct image dimensions
✅ Correct image format
✅ Compressed image
✅ Removed unnecessary metadata
✅ Descriptive filename
✅ Added alt text
✅ Responsive image support
✅ Lazy loading enabled (where appropriate)
✅ Visual quality checked
✅ File size optimized
Frequently Asked Questions (FAQ)
1. Can I compress images without losing quality?
Yes. Lossless compression preserves image quality completely, while modern lossy formats like AVIF and WebP can reduce file size significantly with little to no noticeable visual difference.
2. Which image format gives the smallest file size?
For most photographs, AVIF typically provides the smallest file size while maintaining excellent image quality.
3. Is WebP better than JPG?
For many web use cases, yes. WebP generally delivers smaller file sizes at similar visual quality.
4. Is AVIF better than WebP?
AVIF often achieves higher compression efficiency than WebP, though WebP still offers excellent compatibility and performance.
5. Does image compression improve SEO?
Indirectly, yes. Compressed images improve loading speed, which supports better user experience and technical SEO.
6. Will compression make my images blurry?
Not if you use appropriate compression settings. Excessive lossy compression can reduce quality, so aim for a balanced level.
7. Which compression method is best?
It depends on the image:
- Lossy → Photographs and website images.
- Lossless → Logos, screenshots, and graphics requiring perfect quality.
8. Is PNG always lossless?
Yes. PNG uses lossless compression, making it ideal for preserving image quality.
9. Should I resize images before compression?
Yes. Resizing first removes unnecessary pixels and makes compression more effective.
10. Can I compress images for free?
Yes. Many online tools, including SizeHex, allow you to compress images without installing software.
11. Does removing metadata affect image quality?
No. Removing metadata only deletes hidden information such as camera settings or GPS data; it does not change the visible image.
12. What is the ideal image size for websites?
There is no single perfect size. Images should match the dimensions at which they are displayed and be compressed appropriately.
13. Which format should I use for logos?
SVG is the preferred choice because it scales without losing quality.
14. Which format is best for screenshots?
PNG remains the best option because it preserves sharp text and interface elements.
15. How often should I compress images?
Compress every image before uploading it to your website, blog, online store, or social media platform.
Conclusion
Compressing images without losing noticeable quality is one of the easiest ways to improve website performance.
By selecting the right image format, resizing images before compression, choosing an appropriate compression level, and removing unnecessary metadata, you can dramatically reduce file sizes while preserving excellent visual quality.
For most websites:
- AVIF is ideal for photographs, hero images, and product photos.
- WebP is a strong all-purpose format with broad compatibility.
- PNG is best for screenshots and graphics requiring lossless quality.
- SVG is perfect for logos, icons, and illustrations.
When combined with responsive images, lazy loading, descriptive alt text, and proper sizing, these practices help create faster websites, improve user experience, and support stronger technical SEO.
Try SizeHex Today
Optimize your images in seconds with SizeHex—a free online toolkit designed for bloggers, developers, designers, marketers, students, and businesses.
With SizeHex, you can:
- Compress images while maintaining excellent visual quality.
- Convert between popular image formats.
- Resize images for websites and social media.
- Crop images with precision.
- Generate QR codes instantly.
Whether you're optimizing a personal blog, an online store, or a business website, SizeHex helps you create faster, more efficient images with just a few clicks.
Related Tools
Image Compressor
Compress JPG, PNG, WebP, AVIF, GIF, BMP, TIFF, and other image formats while preserving visual quality.
Image Converter
https://www.sizehex.com/image-converter.html
Convert images between AVIF, WebP, JPG, PNG, SVG, GIF, BMP, TIFF, and more.
Image Resizer
https://www.sizehex.com/image-resizer.html
Resize images for websites, blogs, e-commerce, presentations, and social media.
WebP Converter
https://www.sizehex.com/webp-converter.html
Convert JPG and PNG images into efficient WebP files.
Image Cropper
https://www.sizehex.com/image-crop.html
Crop images using custom dimensions or preset aspect ratios.
QR Code Generator
https://www.sizehex.com/qr-generator.html
Generate QR codes for URLs, contact information, Wi-Fi credentials, and more.