August 20, 2026
How to Get Your Images Indexed by Google (2026): Image Sitemap, Crawlability & SEO
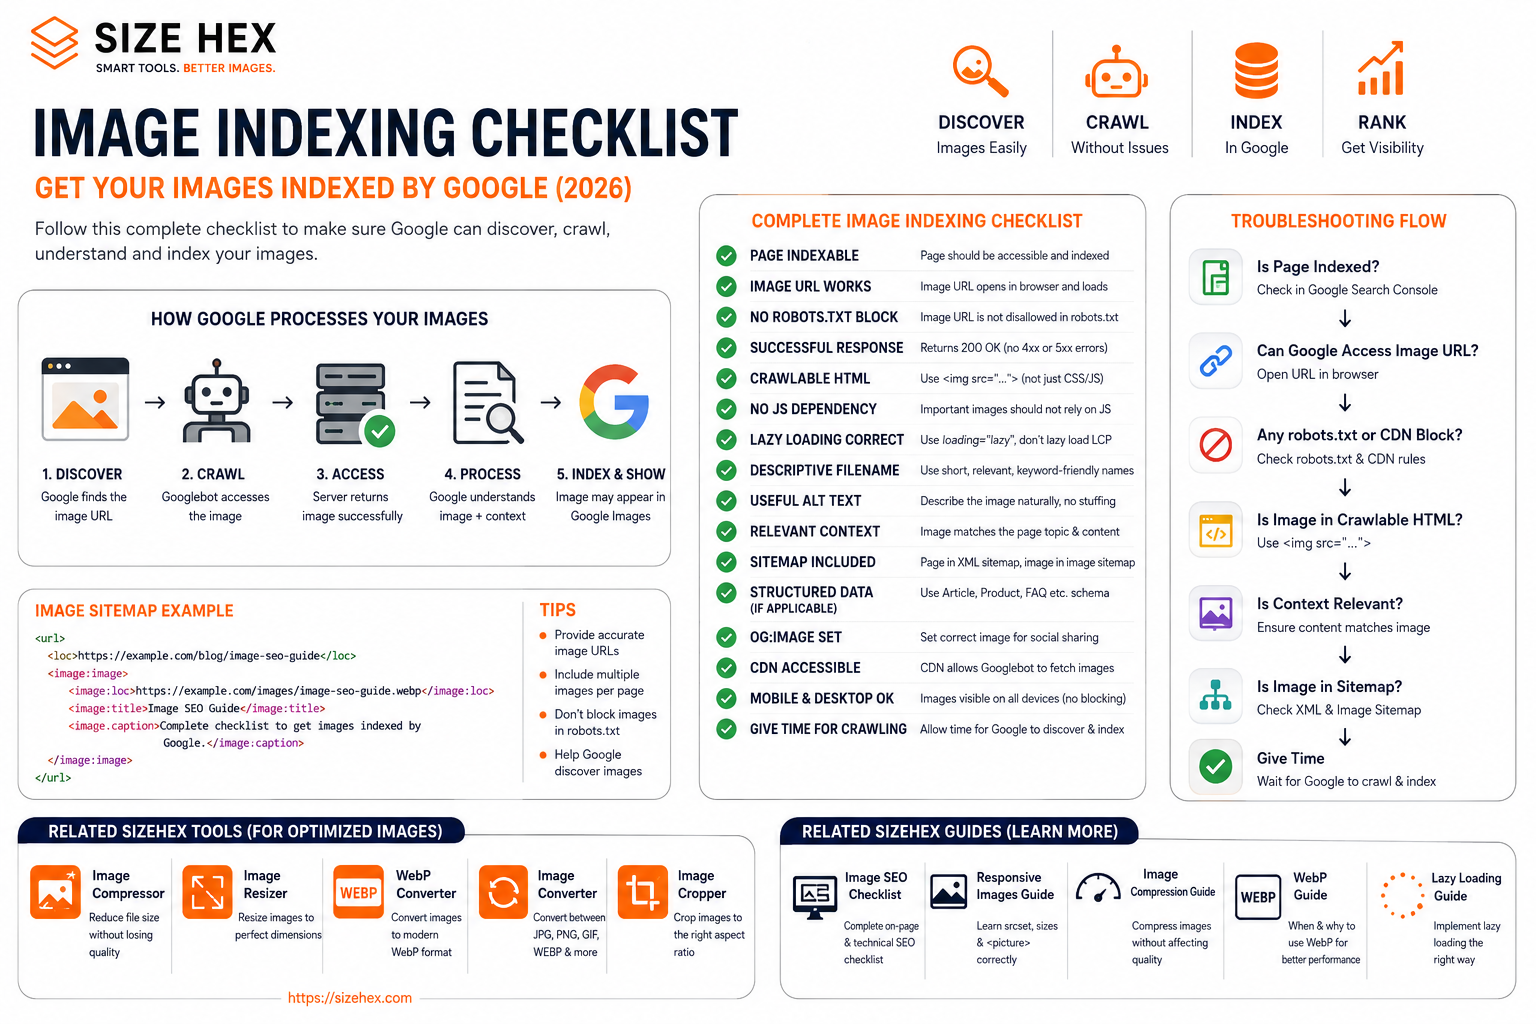
Getting an image onto your website is easy.
Getting Google to discover, crawl, understand, and potentially show that image in Google Images is a different process.
A lot of website owners assume that uploading an image, adding an alt attribute, and waiting for Google to index it is enough.
It isn't.
Google needs to be able to access the image, understand the page where it appears, and discover the image through a crawlable implementation. Google also provides specific guidance around image sitemaps, crawlability, filenames, alt text, and surrounding content.
The good news is that you don't need a complicated system for most websites.
You need to get the fundamentals right.
What Does "Image Indexed by Google" Actually Mean?
There are two different things that are often confused:
Google crawling an image
and
Google indexing/showing an image.
When Googlebot visits a page, it can discover image URLs referenced by the page.
For example:
<imgsrc="/images/image-seo-guide.webp"alt="Image SEO guide">
Google can discover that image URL while crawling the page.
But discovery doesn't guarantee that the image will appear in Google Images.
Google still needs to determine whether the image and the page are useful and relevant enough to show for particular searches.
So think about the process like this:
Website↓Google discovers page↓Google discovers image↓Google crawls image↓Google understands image + page context↓Google processes/indexes it↓Image may appear in Google Images
There is no guaranteed shortcut that forces an image into Google Images.
How Google Finds Images on a Website
The simplest and most reliable starting point is a normal HTML image:
<imgsrc="/images/image-seo.webp"alt="Technical image SEO checklist">
Google's documentation explains that Google can find images referenced in standard HTML <img> elements, including images inside <picture> elements.
This is important because some websites make the mistake of treating every image as a JavaScript component.
For example:
image.src = "/images/example.webp";
may work perfectly for the visitor, but if the important image isn't discoverable in the initial page structure, you can make Google's discovery process unnecessarily complicated.
For important content images, standard HTML is usually the cleaner approach.
<img> vs CSS Background Images
Consider these two implementations.
HTML image
<imgsrc="/images/webp-guide.webp"alt="WebP image optimization guide">
CSS background
.hero {background-image: url("/images/webp-guide.webp");}
The second isn't automatically "bad."
CSS backgrounds are perfectly appropriate for decorative elements.
But if an image represents important page content that you want search engines to understand, a standard HTML <img> is generally preferable.
Google's image documentation specifically recommends using standard HTML image elements for images you want Google to discover.
A simple rule:
Content image →
<img>
Decorative image → CSS can be appropriate
Make Sure the Image URL Can Be Crawled
Even if your HTML is perfect, Google still needs to be able to access the actual image URL.
Suppose your page contains:
<imgsrc="https://example.com/images/seo-guide.webp"alt="Image SEO guide">
Try opening that exact image URL in a browser.
You should be able to access it normally.
Then check whether anything is blocking crawlers.
Common problems include:
-
robots.txtblocking the image directory - Authentication requirements
- Server errors
- Broken image URLs
- Incorrect redirects
-
Images returning
404 - CDN access restrictions
Google's documentation notes that images need to be accessible to Googlebot if you want them to be crawled and potentially indexed.
Check Your robots.txt
One of the easiest things to overlook is:
robots.txt
Imagine your website has:
/images/
but your robots.txt contains a rule that blocks that directory.
Then you could have beautifully optimized images that Google simply cannot crawl.
Before assuming an image-indexing problem is an SEO content problem, check whether the crawler can actually access the resource.
A basic robots.txt might look like:
User-agent: *Allow: /
Your actual configuration may be more restrictive, and that's fine.
The important thing is to make sure you're not accidentally blocking image resources you want Google to access.
A 404 Image Can't Be Indexed
This sounds obvious, but it's worth checking.
Your HTML might contain:
<imgsrc="/images/blog-image.webp"alt="Image SEO example">
But if:
/images/blog-image.webp
returns:
404 Not Found
Google can't crawl the actual image.
Always verify the final image URL.
For a healthy resource, you generally want the server to return a successful response.
Don't Confuse a Redirect With a Broken Image
Suppose:
old-image.webp
redirects to:
new-image.webp
That's different from a broken URL.
Redirects can be useful when an image has moved.
But you shouldn't create unnecessary redirect chains such as:
image-1.webp↓image-old.webp↓image-new.webp↓final-image.webp
Keep important image URLs clean and stable where possible.
Image Filenames Still Matter
Once Google can access the image, give it useful context.
Compare:
IMG_49382.webp
with:
image-indexing-google.webp
The second is much more descriptive.
Google recommends descriptive filenames as one source of information for understanding images.
Don't turn the filename into a keyword list.
Bad:
google-image-indexing-seo-image-indexing-google-images-seo.webp
Better:
google-image-indexing-guide.webp
Keep filenames:
short + descriptive + relevant.
Write Useful Alt Text
Alt text helps provide a textual description of an image.
For example:
<imgsrc="/images/google-image-indexing.webp"alt="Google image indexing workflow showing crawl and discovery steps">
That's useful.
Avoid:
alt="Google images SEO image indexing image SEO Google ranking"
The goal isn't to fit every keyword into the alt attribute.
The goal is to accurately describe the image.
Google recommends descriptive alt text and specifically warns against keyword stuffing.
Your Image Needs Context
Google doesn't only look at the image file.
The page surrounding the image matters too.
Imagine an image named:
image-compression.webp
On a page about:
How to Compress Images Without Losing Quality
The relationship is obvious.
Now put the exact same image on a page about:
Best Restaurants in Mumbai
The context doesn't make sense.
Google's image guidance explains that the content of the page and surrounding text can help Google understand what an image represents.
So think about:
Image + Page + Surrounding Content
as one SEO unit.
Don't Hide Important Images Behind User Interaction
Imagine your article initially contains:
Click "Show Images"↓JavaScript runs↓Images appear
That's not ideal for important content.
If an image is genuinely part of the page content, it's better for the image to be available through crawlable page markup rather than requiring a user interaction before the resource exists.
Google's general crawling guidance recommends making important content available without requiring interactions that a crawler may not perform.
What About Lazy-Loaded Images?
Lazy loading itself isn't bad.
In fact, it can be very useful.
For an image far below the fold:
<imgsrc="/images/example.webp"loading="lazy"width="1200"height="800"alt="Image optimization example">
can help avoid loading unnecessary resources during the initial page load.
But the implementation needs to be crawlable and the image should become available as it approaches the viewport.
Google provides specific guidance for implementing lazy-loaded content without preventing Google from discovering it.
What About Images Loaded With JavaScript?
This is where things can get complicated.
For example:
const image = document.createElement("img");image.src = "/images/example.webp";document.body.appendChild(image);
The browser may display the image perfectly.
But for important SEO images, a simpler HTML implementation is usually preferable:
<imgsrc="/images/example.webp"alt="Example image">
The less dependent your important content is on client-side JavaScript, the easier it is to reason about crawling and discovery.
Image Sitemap: What Is It?
An image sitemap gives search engines additional information about image URLs associated with your pages.
For example:
<url><loc>https://example.com/blog/image-seo.html</loc><image:image><image:loc>https://example.com/images/image-seo.webp</image:loc></image:image></url>
Google supports image information in XML sitemaps and explains that image sitemaps can help Google discover images that might otherwise be difficult to find.
This is particularly useful for websites with:
- JavaScript-loaded images
- Large image libraries
- Image-heavy pages
- Images that aren't easily discoverable through normal crawling
But an image sitemap isn't a magic ranking tool.
Its main purpose is discovery.
Do You Need an Image Sitemap for Every Website?
No.
If your important images are already:
<img src="...">
on crawlable pages, Google may discover them naturally.
An image sitemap becomes more useful when your site's image discovery is complicated or you have a large number of important images.
So don't create one simply because:
"SEO checklist says image sitemap."
First understand whether your site actually needs it.
Normal Sitemap vs Image Sitemap
A normal XML sitemap tells Google about URLs such as:
https://example.com/blog/image-seo.html
An image sitemap provides additional information about image URLs associated with those pages.
Think of it as:
XML Sitemap↓Important pagesImage Sitemap↓Important images
They solve related but different discovery problems.
Google documents image sitemap support separately from standard sitemap functionality.
Does an Image Sitemap Guarantee Google Images Traffic?
No.
This is an important distinction.
An image sitemap can help Google discover images.
It does not guarantee:
- Indexing
- Ranking
- Google Images traffic
- Featured placement
Google still decides which images are useful and relevant for users.
So don't think:
Image Sitemap↓Automatic Google ranking
Think:
Image Sitemap↓Better discovery↓Google can process image↓Google evaluates relevance↓Potential visibility
That's a much more accurate expectation.
Where SizeHex Fits Naturally
Now let's apply the concepts to a real tool website such as SizeHex.
Suppose a SizeHex blog article contains a screenshot of the Image Compressor.
The image could be implemented as:
<imgsrc="/images/image-compressor-guide-800.webp"srcset="/images/image-compressor-guide-400.webp 400w,/images/image-compressor-guide-800.webp 800w,/images/image-compressor-guide-1200.webp 1200w"sizes="100vw"width="1200"height="750"alt="SizeHex Image Compressor showing an image compression result">
Now the image has:
- A descriptive filename
- Crawlable HTML
- Responsive delivery
- Dimensions
- Useful alt text
- Relevant page context
That's the kind of implementation you want on any image-focused website.
The Bigger Image Indexing Checklist
Before expecting Google to discover an important image, check:
☐ Image uses crawlable HTML☐ Image URL works☐ Image isn't blocked by robots.txt☐ Image doesn't return 404☐ Filename is descriptive☐ Alt text is useful☐ Image is surrounded by relevant content☐ Important content isn't hidden behind interaction☐ Lazy loading is implemented correctly☐ Responsive images are implemented correctly☐ Image sitemap is considered where useful
If those fundamentals are correct, you've removed many of the common technical barriers to image discovery.
Related SizeHex Tools
When preparing images before publishing them, these SizeHex tools fit naturally into the workflow:
- Image Compressor — reduce unnecessary image file size before uploading.
- Image Resizer — create appropriate image dimensions for your pages.
- WebP Converter — convert supported images to WebP.
- Image Converter — convert images between supported formats.
- Image Cropper — create the right crop for your page layout.
For example, before publishing a blog image, you can resize → compress → convert → implement the optimized image in your HTML.
Image Discovery, Crawling, and Indexing Are Three Different Things
One of the easiest ways to get confused about Google Images is to treat these three words as if they mean the same thing:
Discovery → Crawling → Indexing
They are different stages.
Discovery
Google finds the image URL.
For example:
<imgsrc="/images/image-seo-guide.webp"alt="Image SEO guide">
Google can discover the image URL while processing the page.
Crawling
Googlebot requests the image from your server.
Your server needs to return the resource successfully.
Indexing
Google processes the image and decides whether it should be included in its searchable image index.
So:
Your Image↓Google discovers URL↓Google crawls URL↓Google processes image↓Google may index it↓Potential Google Images visibility
Getting to the first stage doesn't guarantee the last stage.
Google's documentation makes the same distinction in practice: making an image accessible and discoverable is necessary, but indexing and search visibility are ultimately determined by Google's systems.
Why an Image Can Be on Google-Accessible Page but Still Not Appear
Imagine your blog page is indexed perfectly:
https://example.com/blog/image-seo.html
But the image doesn't appear in Google Images.
That doesn't automatically mean there's an indexing error.
Google may simply have:
- Not discovered the image yet
- Not crawled it yet
- Not processed it yet
- Not considered it useful for the image index
- Not found a relevant search query for it
This is why repeatedly changing the alt text isn't always the solution.
First determine which stage is actually failing.
Image Sitemap: When It Becomes Useful
An image sitemap gives Google another way to discover important image URLs.
A simplified example:
<url><loc>https://example.com/blog/image-seo.html</loc><image:image><image:loc>https://example.com/images/image-seo-guide.webp</image:loc></image:image></url>
Google's documentation supports image sitemap extensions for providing image URLs associated with pages.
This can be particularly useful for websites with:
- Large numbers of images
- JavaScript-generated image content
- Image-heavy websites
- Images that aren't easily discovered through normal crawling
But remember:
Image sitemap = discovery signal
It isn't:
Image sitemap = guaranteed indexing.
Do You Need a Separate Image Sitemap?
Not necessarily.
Google allows image information to be included within your existing XML sitemap structure.
You don't necessarily need:
image-sitemap.xml
as a completely separate file.
For a smaller website, your normal sitemap strategy may already be sufficient if important images are easily discoverable through your HTML.
For a larger image-heavy site, an image sitemap can provide an additional discovery layer.
The right choice depends on how your site is structured.
What Should an Image Sitemap Contain?
At its simplest, you associate an image with the page where it appears.
For example:
<url><loc>https://example.com/blog/image-compression.html</loc><image:image><image:loc>https://example.com/images/image-compression.webp</image:loc></image:image></url>
You can associate multiple images with a single page where appropriate.
The important thing is that the URLs are accurate and accessible.
Google's image sitemap documentation describes the supported XML structure and how image URLs can be associated with page URLs.
Don't Put Broken Image URLs in Your Sitemap
This seems obvious, but automated sitemap generation can introduce problems.
For example:
Sitemap:https://example.com/images/guide.webpActual URL:404 Not Found
The sitemap isn't going to magically make the image available.
Before including an image URL, make sure:
URL exists↓Server responds correctly↓Google can access it
Sitemaps should contain the canonical, valid URLs you actually want search engines to discover.
Don't Block the Same Image in robots.txt
Here's a contradictory setup:
Sitemap:https://example.com/images/guide.webp
but:
robots.txt:Disallow: /images/
You've effectively told Google:
"Here is this image."
and:
"Don't crawl this directory."
That's not a useful setup.
Google's documentation recommends making sure resources you want Google to crawl aren't blocked by robots.txt.
So whenever you troubleshoot image discovery, check both:
Sitemap
and
robots.txt
robots.txt Doesn't Mean "No Index" in the Same Way
Another common misunderstanding is:
"If I block an image in robots.txt, Google will definitely remove it from search."
That's not necessarily how it works.
A robots.txt rule controls crawling access.
It isn't a universal removal mechanism.
If you want to understand Google's current robots.txt behavior, it's better to think:
robots.txt↓Controls crawling
rather than:
robots.txt↓Controls every aspect of indexing
Google explains that robots.txt primarily controls whether crawlers can access URLs, while indexing and removal involve other mechanisms.
Check Your Sitemap in Google Search Console
Once your sitemap is ready, submit your sitemap through Google Search Console.
The important thing here is understanding what the sitemap report actually tells you.
A sitemap being successfully processed does not mean:
Every page indexedEvery image indexedEvery URL ranking
It mainly means Google was able to retrieve and process the sitemap.
Sitemaps help Google discover URLs; they don't guarantee indexing. Google's documentation explicitly states that submitting a sitemap is a hint rather than a guarantee that URLs will be crawled or indexed.
Search Console's URL Inspection Is More Useful for the Page
Suppose this page contains your image:
https://example.com/blog/image-seo.html
Start by inspecting the page URL in Search Console.
You want to understand:
Is the page indexed?↓Can Google access it?↓Is it canonical?↓Is crawling allowed?
If the page itself isn't accessible or isn't being indexed, don't immediately blame the image.
The image's discoverability is partly dependent on the page containing it.
Don't Expect URL Inspection to Show Every Image
Google Search Console's URL Inspection tool is primarily designed around URLs/pages.
It isn't an image-by-image diagnostic dashboard that tells you:
Image #1 → IndexedImage #2 → IndexedImage #3 → Not Indexed
So don't use Search Console expecting a simple image-indexing status for every asset.
Instead, combine:
Search Console + page source + browser testing + Google Images searches
to diagnose the problem.
Search Google Images Directly
If you're trying to determine whether a particular image has visibility, you can search Google Images using relevant queries.
You can also use:
site:example.com
to investigate image-related results associated with your domain.
For example:
site:sizehex.com image compressor
This isn't a perfect image-indexing diagnostic, but it can provide useful evidence about what Google is surfacing.
Remember that search results can vary by query, location, device, and Google's ranking systems.
Don't Assume "Not Showing for My Keyword" Means "Not Indexed"
This distinction is extremely important.
Suppose your image is indexed.
But you search:
best image compressor
and don't see it.
That doesn't necessarily mean:
"Google hasn't indexed my image."
It could simply mean the image isn't competitive or relevant enough for that query.
So:
Not ranking≠Not indexed
These are two different problems.
Image Indexing vs Image Ranking
Think of it this way:
Indexing
Google knows about the image and has processed it.
Ranking
Google decides where and when that image should appear for a particular search.
You can have:
Indexed: YESRanking: LOW / NONE
That's completely possible.
And the solution isn't necessarily an image sitemap.
Ranking depends on many factors, including relevance, page context, quality, and Google's search systems.
What Happens With Lazy-Loaded Images?
Lazy loading can make image discovery more complicated if implemented incorrectly.
A problematic implementation might look like:
<imgdata-src="/images/example.webp"alt="Example">
with JavaScript later changing:
img.src = img.dataset.src;
The browser eventually gets the image.
But your implementation now depends heavily on JavaScript.
Google recommends ensuring lazy-loaded content follows its requirements so that the image can still be discovered as the page is processed.
A simpler implementation is:
<imgsrc="/images/example.webp"loading="lazy"width="1200"height="800"alt="Example">
For ordinary below-the-fold images, native lazy loading is generally much easier to maintain.
Don't Lazy-Load an Image Just Because It Exists
Consider a blog page:
Hero image↓Introduction↓Screenshot↓Screenshot↓Screenshot↓Screenshot
The hero image may be critical.
The later screenshots may not be.
So:
Hero→ normal loadingLower screenshots→ lazy loading
This is a better strategy than applying the same attribute to every image.
web.dev recommends avoiding lazy loading images that are likely to be the LCP element.
JavaScript Image Galleries Need Extra Attention
Suppose your website has an image gallery.
Initially:
<div id="gallery"></div>
Then JavaScript fetches image URLs and generates:
<img src="image1.webp"><img src="image2.webp"><img src="image3.webp">
For a normal interactive gallery, that's fine.
But if those images are important search content, you should make sure the important images are still discoverable through a crawlable implementation.
If discovery depends heavily on interaction, consider whether the important content can also exist in normal HTML.
Google's JavaScript SEO documentation explains that important content should be available in a way Google can process reliably.
CDN Images Can Still Be Indexed
Using a CDN doesn't automatically prevent image indexing.
For example:
HTML:https://sizehex.com/blog/pageImage:https://cdn.example.com/images/guide.webp
That can work.
The important considerations are:
- Image URL is accessible
- Google can crawl it
- Server/CDN doesn't block Googlebot
- Correct HTTP response
- No accidental authentication
- Page context is relevant
The image doesn't necessarily have to be hosted on the exact same domain as the page.
Be Careful With CDN Security Rules
A CDN can accidentally block crawlers through:
- Bot protection
- User-agent filtering
- Hotlink protection
- Authentication
- Geographic restrictions
- Rate limiting
If normal users can see an image but Google cannot fetch it, investigate the CDN configuration.
This is one reason why image-indexing problems aren't always caused by HTML or SEO.
Sometimes the infrastructure is the problem.
Image URLs Should Be Stable
Suppose you publish:
/images/blog-image.webp
and then repeatedly change it to:
/images/blog-image-v2.webp/images/blog-image-final.webp/images/blog-image-final-new.webp
You're creating unnecessary URL changes.
A cleaner approach is to maintain stable, descriptive URLs whenever possible.
If an image genuinely needs to move, update references and redirects appropriately.
This is especially useful for evergreen blog content that you expect to remain online for years.
Don't Confuse og:image With Image Indexing
You may have:
<metaproperty="og:image"content="https://example.com/images/share-image.jpg">
This is primarily social-sharing metadata.
It tells platforms which image to associate with a shared page.
It isn't a replacement for:
<img src="...">
or an image sitemap.
So keep these concepts separate:
<img>↓Page imageog:image↓Social sharing previewImage Sitemap↓Image discovery signal
They can work together, but they serve different purposes.
Google's current documentation also discusses preferred images for search and Discover using page metadata and structured data, which is a separate concern from simply making every image crawlable.
Structured Data Can Provide Additional Image Context
For certain content types, structured data can include image information.
For example, an Article can have an image property.
A simplified example:
{"@type": "Article","image": ["https://example.com/images/article-cover.webp"]}
This doesn't replace the visible image on the page.
It provides structured information about the content.
Google's structured data documentation explains the supported image properties for relevant structured-data types.
Use structured data when it genuinely applies to the page.
Don't add Article structured data to every page simply because it contains an image.
The Preferred Image Matters for Some Search Experiences
A page may contain several images:
LogoHero imageScreenshotAuthor photoDecorative illustration
If you're implementing structured data or social metadata, you should be intentional about which image represents the content.
For an article, that could be the main article image.
This becomes particularly relevant for search features that use a representative image or thumbnail.
Google's current guidance discusses preferred images for Search and Discover through structured data and other supported metadata.
A Practical Technical Audit
If one of your images isn't appearing in Google, don't start changing everything.
Follow this order.
1. Open the page
Does the page load?
2. Open the image URL
Does the image itself load?
3. Check the HTTP response
Is it returning successfully?
4. Check robots.txt
Is the image blocked?
5. Inspect HTML
Is there a crawlable <img src="...">?
6. Check lazy loading
Is JavaScript hiding the image URL?
7. Check the sitemap
Is the page included?Would an image sitemap be useful?
8. Check Search Console
Is the page itself indexed?
9. Search Google Images
Does the image appear for relevant searches?
This order prevents you from wasting time on advanced SEO before fixing basic accessibility.
A Real-World Example
Imagine you publish:
/blog/image-compression-guide
The page contains:
/images/image-compression-before-after.webp
But the image isn't appearing in Google Images.
You check the page source.
You find:
<imgdata-src="/images/image-compression-before-after.webp"alt="Image compression comparison">
Then JavaScript adds the actual src.
Now you have a possible discovery issue.
A simpler implementation would be:
<imgsrc="/images/image-compression-before-after.webp"width="1200"height="800"loading="lazy"alt="Before and after image compression comparison">
If the image is below the fold, lazy loading can remain.
The key improvement is that the image URL exists directly in the HTML.
Another Example: The Sitemap Is Correct but the Image Is Blocked
Suppose your image sitemap contains:
https://example.com/images/compressor.webp
Everything looks correct.
But robots.txt contains:
Disallow: /images/
Now Google is being told about an image it cannot crawl.
Fixing the sitemap alone won't solve the underlying problem.
This is why image SEO needs to be treated as a complete technical system rather than a single XML file.
The Complete Image Discovery Flow
By now the system should look like this:
YOUR PAGE│↓Crawlable HTML│┌───────┴───────┐↓ ↓Page URL Image URL│ │↓ ↓Google crawls Google crawls│ │└───────┬───────┘↓Image + Context↓Processing↓Indexing↓Search Visibility
And an image sitemap can provide an additional discovery path:
Image Sitemap↓Image URL↓Google discovery
It's an additional signal—not a guarantee.
Related SizeHex Tools
When preparing images for your website, the technical indexing work comes after the image itself is ready.
For that preparation:
- Image Compressor — reduce unnecessary file size.
- Image Resizer — create appropriate image dimensions.
- WebP Converter — prepare WebP versions.
- Image Converter — convert between supported formats.
- Image Cropper — create an appropriate crop for your layout.
The practical sequence is:
Resize → Compress → Convert/Crop → Publish → Make crawlable → Let Google discover it.