August 31, 2026
How to Reduce Image Size for Email Without Losing Quality
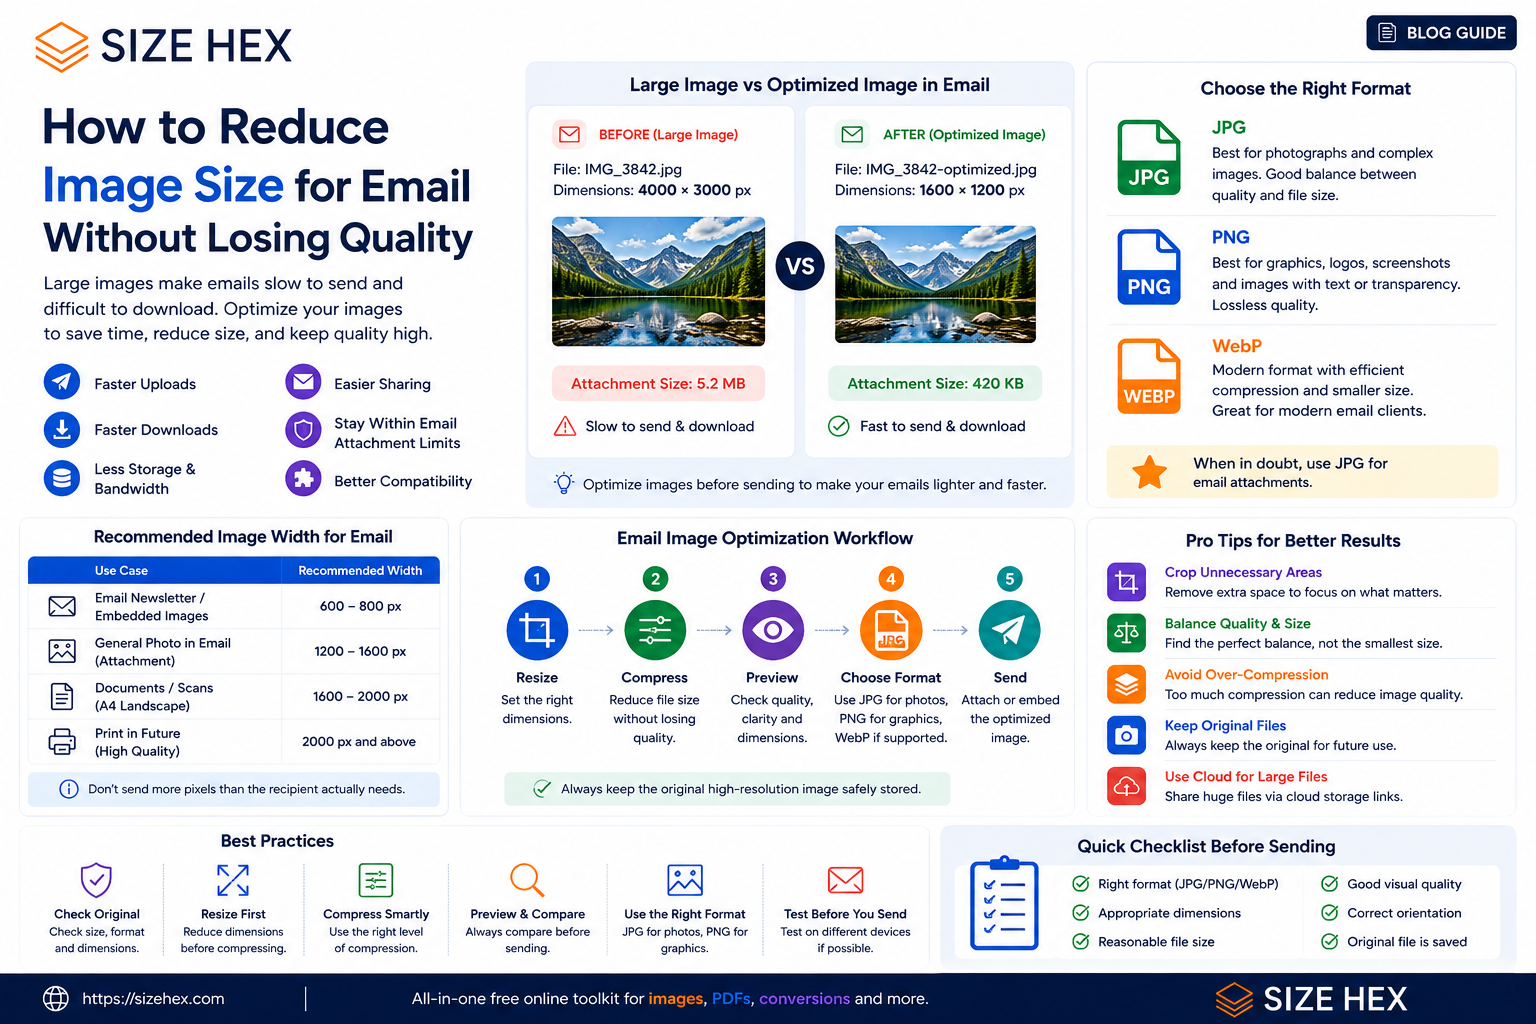
How to Reduce Image Size for Email Without Losing Quality
Sending a large image through email can create unnecessary problems.
A high-resolution photograph may look excellent on your computer, but attaching a multi-megabyte image can make the email larger, slower to upload, and more difficult for recipients to download.
Large images can also be inconvenient when you're sending multiple photographs, product images, documents, newsletters, or marketing graphics in a single email.
The good news is that you usually don't need to sacrifice noticeable visual quality just to make an image smaller.
By choosing appropriate dimensions, using the right image format, and applying sensible compression, you can significantly reduce image file size while keeping the image clear and professional.
In this guide, you'll learn how to reduce image size for email, which formats to use, what dimensions work well, and how to prepare images before attaching or embedding them in an email.
Why Should You Reduce Image Size Before Sending an Email?
Modern smartphones and cameras can produce extremely large photographs.
A single photo may easily be several megabytes in size.
If you attach multiple full-resolution photographs to an email, the total attachment size can become very large.
Reducing image size before sending can provide several benefits:
- Smaller email attachments
- Faster uploads
- Faster downloads
- Less bandwidth usage
- Easier sharing
- Better compatibility with attachment limits
- More convenient storage and forwarding
For example, imagine you have five photographs that are each around 5 MB.
That creates approximately:
5 × 5 MB = 25 MB
of image data before considering the rest of the email.
If those images are resized and compressed appropriately, the total size can often be reduced substantially while still looking perfectly good for normal email viewing.
What Is the Best Image Size for Email?
There isn't one universal dimension that works for every email.
The ideal size depends on what you're using the image for.
A large photograph intended to be viewed as an attachment may need different dimensions from a small image embedded inside a newsletter.
For general email sharing, extremely large camera-original dimensions are often unnecessary.
For example, if an image will mainly be viewed on a laptop or smartphone screen, you may not need to send a photograph with several thousand pixels on each side.
The goal is simple:
Don't send significantly more pixels than the recipient actually needs.
Resize Before You Compress
One of the most useful ways to reduce an image's file size is to resize it before compression.
Imagine you have an original photograph that is:
6000 × 4000 pixels
but the recipient only needs to view it inside an email.
Sending the full-resolution original may be unnecessary.
You can first reduce the dimensions to something more appropriate for the intended use and then compress the resulting image.
The workflow becomes:
Original Image → Resize → Compress → Email
For exact pixel dimensions, you can use the SizeHex Image Resizer.
Resize and Compression Are Not the Same Thing
It's important to understand the difference.
Image Resizing
Resizing changes the actual width and height of an image.
For example:
4000 × 3000 px → 1600 × 1200 px
The image contains fewer pixels.
Image Compression
Compression reduces the amount of data required to store the image.
For example:
2 MB → 500 KB
The dimensions may remain exactly the same.
Both techniques can reduce the final file size, but they solve different problems.
For many email images, combining them works better than relying on compression alone.
Which Image Format Should You Use for Email?
The best format depends on the type of image.
JPG
JPG is usually a practical choice for photographs.
It offers broad compatibility and can provide relatively small file sizes with appropriate compression.
Use JPG for:
- Photos
- Travel pictures
- Product photography
- Portraits
- General photographic content
PNG
PNG is useful when you need transparency or when the image contains graphics, text, or other elements where lossless quality is important.
However, PNG files can sometimes be significantly larger than JPG for photographic images.
WebP
WebP can provide efficient compression and is increasingly useful for websites and modern applications.
However, when sending an image as a general email attachment, compatibility with the recipient's software should be considered.
If you specifically need WebP, you can use the SizeHex WebP Converter.
How Much Should You Compress an Image for Email?
There is no single compression percentage that works for every photograph.
A good approach is to reduce the file size gradually and inspect the result.
For example:
Original: 4.8 MB
↓
Optimized: 900 KB
↓
Check the image
↓
If quality is still excellent, use the optimized version.
The objective isn't to create the smallest possible file.
The objective is to create the smallest practical file that still looks good.
You can use the SizeHex Image Compressor to reduce image file size before attaching the image to an email.
Should You Compress Images Before Emailing Them?
In most situations, yes—especially when the original photographs are very large.
Instead of attaching the original camera file, create an optimized copy specifically for sharing.
This has an additional advantage:
You can keep the original high-resolution photograph untouched.
Your workflow can therefore be:
Original Photo
↓
Create Optimized Copy
↓
Resize if necessary
↓
Compress
↓
Attach to Email
This gives you a smaller attachment without permanently changing your original photograph.
How to Reduce Image Size for Email
Once you know that large images can make email attachments unnecessarily heavy, the next step is preparing the image correctly before sending it.
The most effective workflow is usually:
Resize → Compress → Check → Send
Step 1: Check the Original Image
Start by checking the original photograph or graphic.
Look at:
- File format
- File size
- Width and height
- Image quality
- Whether the full resolution is actually necessary
A smartphone photograph may be several thousand pixels wide even though the recipient only needs to view it on a phone or laptop.
There is usually no reason to send the full camera resolution when a smaller copy will work just as well.
Step 2: Resize the Image if Necessary
If the original image is much larger than required, resize it first.
For example:
Original: 6000 × 4000 pixels
↓
Email copy: 1600 × 1067 pixels
The exact dimensions depend on the purpose of the image.
For email newsletters and embedded content, a width around 600–800 pixels can be appropriate for many layouts, while ordinary photo attachments may have different requirements. SizeHex
You can set exact dimensions using the SizeHex Image Resizer. SizeHex
Step 3: Compress the Image
After resizing, compress the resulting image.
This reduces the amount of data stored in the file without necessarily changing its dimensions.
For example:
2.8 MB → 650 KB
The actual reduction will vary depending on the image and compression settings.
The goal isn't to make the file as tiny as possible.
Instead, aim for a practical balance between:
File Size + Image Quality
You can use the SizeHex Image Compressor to optimize the file before attaching it to an email. SizeHex
Step 4: Choose the Right Format
The format you choose can have a significant effect on the final file size.
JPG for Photographs
JPG is generally a practical choice for photographs because it provides good visual quality at relatively small file sizes.
Use JPG for:
- Camera photos
- Travel photographs
- Portraits
- Product photos
- General photographic attachments
PNG for Graphics
PNG can be useful for graphics, screenshots, logos, and images where transparency or lossless compression is important.
However, a photographic image saved as PNG can sometimes be much larger than the equivalent JPG.
WebP for Supported Workflows
WebP can provide efficient compression and is useful for modern web content.
However, if you're sending an image to someone as an email attachment, consider whether their email software and workflow support the format you choose.
Step 5: Compress Multiple Photos Together
If you're sending several photographs, don't automatically attach the original files.
For example:
10 original photos × 4 MB = approximately 40 MB
That can create an unnecessarily large email.
Instead, create optimized copies of the photographs before attaching them.
A better workflow is:
Original Photos
↓
Resize where necessary
↓
Compress
↓
Review the results
↓
Attach optimized copies
Keep your original high-resolution photographs separately.
Attachment vs Embedded Image
There is an important difference between attaching an image and embedding an image inside an email.
Image Attachment
The image appears as a downloadable file attached to the message.
This is useful when the recipient needs the actual image file.
Embedded Image
The image appears directly inside the email body.
This is common for newsletters, announcements, signatures, and marketing emails.
For embedded images, dimensions become especially important because an unnecessarily large image can increase the amount of data the recipient's email client needs to download.
Don't Use Full Camera Resolution for Every Email
Modern smartphones can capture extremely high-resolution photographs.
That's useful when you need to crop, print, or edit the original.
But email recipients don't necessarily need the full resolution.
For example, if you're simply sending a photograph for someone to view on their phone, sending a massive original image may provide little practical benefit.
Create a separate email-friendly copy instead.
This gives you two versions:
Original → High-resolution archive
Optimized copy → Email/sharing
What If the Email Has a File-Size Limit?
Different email services can impose different attachment limits.
If your optimized images still exceed the limit, you have several options:
- Reduce image dimensions.
- Compress the images further.
- Send fewer images per email.
- Use a cloud-storage link when appropriate.
- Create a compressed archive if the recipient needs the original files.
Don't keep reducing quality blindly.
If the image becomes visibly blurry, go back and increase the quality or dimensions.
A Practical Example
Imagine you have a smartphone photograph:
Original
- Format: HEIC
- Dimensions: 4032 × 3024 px
- File size: 4.5 MB
You need to send it through email.
A practical workflow could be:
HEIC
↓
Convert to JPG if necessary
↓
Resize to a practical dimension
↓
Compress JPG
↓
Final email copy
The original 4.5 MB file may become substantially smaller while remaining perfectly suitable for normal viewing.
If you first need to convert a HEIC photograph, you can use the SizeHex HEIC to JPG Converter.
Keep the Original File
Never overwrite your original photograph just because you created a smaller email version.
Instead, keep:
Original → untouched
Optimized copy → email
This becomes particularly useful if you later need a high-resolution version for printing, editing, or another project.
Privacy Matters When Optimizing Personal Photos
Email photographs can contain personal or sensitive visual information.
When using an image optimization service, it's worth understanding how the processing works.
SizeHex states that its image processing happens directly in the browser, so images are processed locally on the user's device rather than uploaded to a remote server. SizeHex
That can be particularly useful when optimizing personal photographs before sharing them.
Quick Email Image Optimization Workflow
For most situations, you can follow this simple process:
1. Check the original
↓
2. Resize if unnecessarily large
↓
3. Choose an appropriate format
↓
4. Compress the image
↓
5. Open and inspect the result
↓
6. Check the final file size
↓
7. Attach or embed it in your email
This approach gives you a much better balance between image quality and attachment size.
Related SizeHex Tools
If your image needs additional preparation before sending:
Resize: SizeHex Image Resizer SizeHex
Compress: SizeHex Image Compressor SizeHex
Convert formats: SizeHex Image Converter
Convert HEIC: SizeHex HEIC to JPG Converter
Crop: SizeHex Image Crop Tool SizeHex
The Simple Rule
You don't need to make every email image extremely small.
Instead:
Send the smallest practical image that still provides the quality and dimensions the recipient actually needs.
That keeps emails easier to send, download, store, and share without unnecessarily sacrificing image quality.
Best Image Size and Compression Settings for Email
Reducing an image for email is not just about making the file smaller. The final image should also remain clear, correctly sized, and easy for the recipient to use.
The right settings depend on whether you're sending a photograph, a screenshot, a document, or an image inside a newsletter.
What Is a Good Image File Size for Email?
There is no single file-size limit that is ideal for every email.
For ordinary photographs, a few hundred kilobytes can often be enough for comfortable viewing, while high-resolution originals may be unnecessarily large.
For example:
Original photo: 5 MB
Optimized copy: 500 KB–1 MB
The exact result depends on the image dimensions, content, and compression level.
If the recipient needs the original full-resolution photograph, don't aggressively compress it just to make the email smaller. In that situation, cloud storage or another file-sharing method may be more appropriate.
What Width Should an Email Image Have?
For images displayed inside the email body, the required width depends on the email template and layout.
A common approach is to create the image around the width of the content area rather than using the full resolution of the original photograph.
For example:
Original: 6000 px wide
Email version: 1200 px wide
The exact dimensions should be based on the design and the intended display size.
For normal photo attachments, you have more flexibility because the recipient can open the image separately.
Don't Resize an Image More Than Necessary
Although resizing can dramatically reduce file size, excessive resizing can remove useful detail.
For example:
4000 × 3000 → 200 × 150
may make the file extremely small, but the image will no longer be useful for many purposes.
Instead, determine how the recipient will actually use the image.
Ask:
- Will they only view it?
- Will they print it?
- Will they edit it?
- Will they upload it somewhere else?
- Do they need the original resolution?
The answer determines how aggressively you should optimize it.
JPEG Quality: Find the Right Balance
JPG compression works by reducing image data.
Higher compression generally produces a smaller file, but excessive compression can create visible artifacts.
You may notice:
- Blocky details
- Blurry edges
- Loss of fine texture
- Color artifacts
- Reduced text clarity
Therefore, don't automatically choose the strongest possible compression.
A better approach is:
Compress → Preview → Compare → Adjust
If the image still looks clean, the optimized version is probably suitable for email.
Screenshots Need Different Treatment
Screenshots often contain:
- Text
- Buttons
- Interface elements
- Fine lines
- Small icons
These details can become difficult to read when heavily compressed.
If you're emailing a screenshot, prioritize readability over achieving the smallest possible file size.
For photographic content, JPG is often practical.
For screenshots containing lots of sharp text and simple graphics, PNG may sometimes be more appropriate.
Product Images and Marketing Graphics
If you're sending product images or marketing graphics through email, visual quality matters.
The recipient should be able to clearly see:
- Product details
- Logos
- Text
- Packaging
- Important visual features
Don't optimize the image so aggressively that the product appears blurry.
Instead, create an appropriately sized copy and use moderate compression.
If the same image will also be used on a website, you may want to create a separate web-optimized version rather than using the exact same file everywhere.
When You Shouldn't Compress the Image
Compression isn't always the right solution.
Avoid aggressive compression when:
- The recipient needs the original photograph
- The image will be professionally printed
- The recipient needs to edit the image
- Fine details are critical
- The image is being used as evidence or documentation
- The original file needs to remain intact
In these cases, keep the original file and share it through an appropriate file-sharing method if the email attachment is too large.
A Better Workflow for Different Types of Images
For Normal Photos
Resize if necessary → Compress → Check → Email
For HEIC Photos
HEIC → Convert to JPG → Resize if necessary → Compress → Email
For Screenshots
Resize if necessary → Choose JPG/PNG → Compress carefully → Check text → Email
For Large Collections
Select photos → Create optimized copies → Check total size → Email or share via cloud storage
This prevents you from applying the same settings blindly to every type of image.
How to Create an Email-Friendly Image with SizeHex
If you have a large image that needs to be emailed, you can use the following workflow:
1. Resize
Open the SizeHex Image Resizer and set appropriate dimensions for the intended use.
2. Compress
Open the SizeHex Image Compressor and reduce the file size while checking the image quality.
3. Check the Result
Open the optimized file and verify that:
- The image is sharp
- Text remains readable
- Dimensions are correct
- File size is appropriate
4. Send the Optimized Copy
Attach the optimized version to your email.
Keep the original image separately.
Related SizeHex Tools
If your email image needs additional preparation:
- Image Resizer — change exact pixel dimensions.
- Image Compressor — reduce image file size.
- Image Converter — convert between supported image formats.
- HEIC to JPG Converter — convert HEIC photographs to JPG.
- Image Crop Tool — remove unwanted areas before sending.
Final Checklist Before Sending
Before attaching an optimized image, quickly check:
✓ Correct format
✓ Appropriate dimensions
✓ Reasonable file size
✓ Good visual quality
✓ Text is readable
✓ Correct orientation
✓ Original file is safely stored
Once these checks are complete, your image is ready to send.
Conclusion
Reducing image size for email doesn't mean sacrificing image quality.
The most effective approach is to create a separate optimized copy of the original image, resize it when necessary, choose an appropriate format, and apply sensible compression.
For most everyday email use, the goal should not be the smallest possible file.
The goal is the smallest practical file that still looks good and serves its purpose.
With the right workflow, you can make large photographs and graphics much easier to send while keeping the original high-quality files safely preserved.