August 25, 2026
WebP vs PNG: Which Image Format Is Better for Websites?
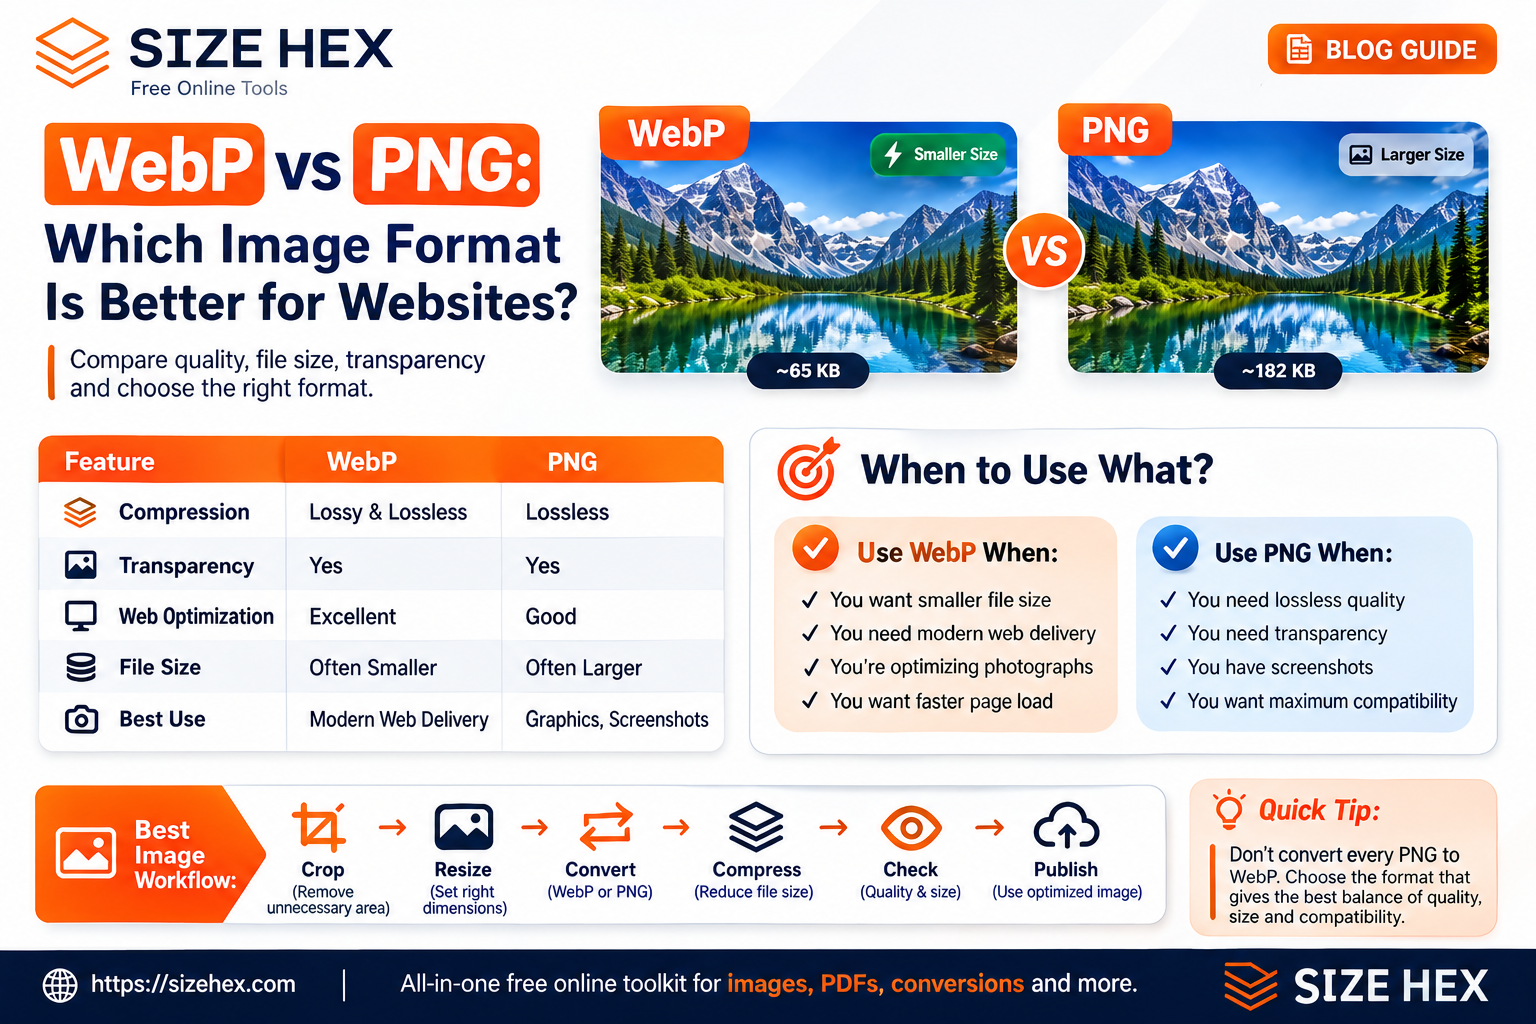
WebP vs PNG: Which Image Format Is Better for Websites?
Choosing the right image format can make a significant difference when preparing images for a website.
PNG has been widely used for years because it supports lossless compression and transparency. WebP is a newer format designed to provide efficient image compression while also supporting transparency and other useful features.
But does that mean WebP is always better than PNG?
Not necessarily.
The better format depends on the type of image, required quality, transparency, file size, browser requirements, and how the image will be used.
In this guide, we'll compare WebP and PNG and explain when you should use each format for your website.
What Is PNG?
PNG, or Portable Network Graphics, is a raster image format that supports lossless compression and transparency.
When an image is saved as PNG using lossless compression, the image data can be preserved without the type of quality degradation commonly associated with lossy compression.
PNG is particularly useful for images such as:
- Logos
- Icons
- Screenshots
- Interface graphics
- Illustrations
- Images with transparent backgrounds
- Graphics containing sharp text or edges
For example, a company logo with a transparent background may be better suited to PNG than a traditional JPG file.
However, PNG files can become relatively large, particularly when used for detailed photographs.
What Is WebP?
WebP is an image format designed for efficient delivery on the web.
It supports both lossy and lossless compression and can also support transparency.
This makes WebP suitable for many different types of website imagery, including:
- Photographs
- Blog images
- Product images
- Thumbnails
- Graphics
- Transparent images
If you already have PNG or other supported image files and want to create WebP versions, you can use the SizeHex WebP Converter.
WebP vs PNG: What's the Main Difference?
The biggest practical difference is often file efficiency.
PNG can preserve image information very effectively, but that can result in larger files for certain types of images.
WebP provides both lossy and lossless compression options, allowing it to produce efficient files for many web use cases.
However, the exact difference depends on the image itself.
A simple graphic, a screenshot, and a high-resolution photograph can behave very differently when converted between formats.
WebP vs PNG for File Size
If reducing image file size is a priority, WebP is often worth testing.
For example, a photograph saved as PNG may be considerably larger than a visually similar WebP version.
A smaller image file can reduce the amount of data that needs to be downloaded by the browser.
However, you shouldn't assume that every WebP file will automatically be smaller than every PNG file.
The result depends on:
- Image content
- Compression settings
- Dimensions
- Quality level
- Whether the WebP version uses lossy or lossless compression
The best approach is to compare the actual output rather than choosing a format based only on its name.
WebP vs PNG for Image Quality
PNG is often preferred when preserving exact image information is important.
This can be useful for:
- Screenshots
- Text-heavy graphics
- Logos
- Simple illustrations
- Interface elements
WebP can also provide excellent visual quality, particularly when an appropriate quality setting is selected.
For photographs and many web graphics, a properly optimized WebP image can provide a strong balance between quality and file size.
The important point is that file format alone doesn't determine image quality.
Dimensions, compression settings, and the original image all matter.
WebP vs PNG for Transparency
Both WebP and PNG can support transparent images.
This makes both formats useful for:
- Logos
- Icons
- Cut-out products
- Decorative graphics
- Transparent overlays
If your image requires transparency, you don't necessarily have to use PNG.
WebP can also be a suitable option when your website workflow supports it.
When Should You Use PNG?
PNG is still a useful format and shouldn't be treated as obsolete.
Consider PNG when:
- Lossless image preservation is important.
- You need transparency.
- The image contains sharp text or simple graphics.
- You're working with screenshots.
- Compatibility with an existing workflow is important.
For these situations, PNG can remain a practical choice.
When Should You Use WebP?
WebP can be a strong choice when:
- You want efficient web image delivery.
- You need transparency with efficient compression.
- You're optimizing photographs for a website.
- You want to reduce image payloads.
- Your website workflow supports modern image formats.
The correct choice should still be based on the actual image and its intended use.
WebP vs PNG: Which One Should You Choose?
Choosing between WebP and PNG depends on what you're creating and how the image will be used.
There is no universal rule that says one format is always better. Instead, consider the image type, required transparency, visual quality, file size, and your website's technical requirements.
WebP vs PNG for Photographs
For photographs, WebP is often a more practical option for websites.
Photographs usually contain thousands of colors, gradients, textures, and fine details. Using an efficient compression format can significantly reduce the amount of data required to display these images.
PNG can preserve photographic detail effectively, but the resulting files may be much larger than necessary for web delivery.
If you have a large PNG photograph, you can test a WebP version using the SizeHex WebP Converter and compare the resulting file size and visual quality.
The important thing is to compare the actual output rather than assuming that conversion will always produce the same result.
WebP vs PNG for Logos
For logos, the choice depends on how the logo was created and how it needs to be used.
PNG remains a popular choice for logos with transparent backgrounds because it is widely supported and can preserve sharp edges.
WebP can also support transparency and may provide a smaller file for some logos and graphics.
If your logo contains simple shapes, solid colors, or transparency, test both formats and choose the version that provides the best balance between appearance and file size.
WebP vs PNG for Screenshots
Screenshots often contain text, interface elements, icons, and sharp edges.
PNG can be useful for screenshots because lossless compression can preserve these details accurately.
However, WebP can also work well for screenshots, especially when reducing file size is important.
The best choice depends on the screenshot itself.
A screenshot containing lots of text may benefit from a lossless format, while a more photographic or visually complex screenshot may respond differently to compression.
WebP vs PNG for Transparent Images
Transparency is one of the reasons PNG became so popular for website graphics.
WebP also supports transparency, so you don't necessarily have to keep every transparent image as PNG.
For example, a transparent product cutout or decorative website graphic could potentially be converted to WebP to reduce its file size.
Before replacing the PNG, check:
- Transparency
- Edges
- File size
- Visual quality
- Compatibility with your website
Does WebP Always Have a Smaller File Size?
No.
This is an important point.
WebP is designed for efficient compression, but the final file size depends on several factors.
These include:
- Original image
- Image dimensions
- Compression mode
- Quality setting
- Image complexity
- Whether the file uses lossy or lossless compression
For example, converting a small simple PNG graphic to WebP may not produce a dramatic reduction in file size.
On the other hand, a large photographic image may show a much more noticeable difference.
Always compare the original and converted files.
Should You Convert Every PNG to WebP?
Not necessarily.
If an existing PNG is already small, looks excellent, and fits your website's requirements, there may be little reason to convert it simply because WebP is newer.
Conversion makes more sense when you have a specific goal, such as:
- Reducing image payload
- Improving web delivery efficiency
- Optimizing large images
- Standardizing supported website assets
- Reducing storage requirements
Optimization should be based on actual results rather than following a format trend blindly.
WebP vs PNG for Website Performance
Image format can influence website performance because images often represent a significant portion of the data downloaded by a page.
Reducing unnecessary image bytes can help reduce the amount of data a browser needs to download.
However, format is only one part of image optimization.
You should also consider:
- Image dimensions
- Compression level
- Responsive images
- Lazy loading
- Width and height attributes
- Image placement
- Caching
- Overall page resources
For example, converting a 4000-pixel-wide PNG to WebP may reduce its file size, but if the website only needs an 800-pixel-wide image, resizing it first may provide an even more appropriate result.
You can use the SizeHex Image Resizer to create suitable dimensions before converting and optimizing the image.
A Better Web Image Optimization Workflow
Instead of simply converting PNG files to WebP, use a complete workflow:
Step 1 — Check the dimensions
Determine how large the image actually needs to be.
Step 2 — Crop if necessary
Remove unnecessary areas from the image.
Step 3 — Choose the format
Compare PNG and WebP based on the image type and requirements.
Step 4 — Convert
Create the required format using an appropriate converter.
Step 5 — Compress
Reduce the final file size while maintaining acceptable visual quality.
Step 6 — Compare
Check the dimensions, file size, transparency, and visual quality.
Step 7 — Publish
Use the version that provides the best overall result for your website.
This approach is much more reliable than automatically converting every image to a particular format.
WebP vs PNG: Final Comparison and Best Practices
WebP and PNG are both useful image formats, but they are designed for slightly different purposes. The right choice depends on the type of image, the required quality, transparency, file size, and how the image will be delivered on your website.
Instead of choosing one format for every situation, compare the actual result and use the format that best fits the image.
WebP vs PNG: Quick Comparison
| Feature | WebP | PNG |
|---|---|---|
| Lossy compression | Yes | No |
| Lossless compression | Yes | Yes |
| Transparency | Yes | Yes |
| Suitable for photographs | Yes | Sometimes |
| Suitable for logos | Yes | Yes |
| Suitable for screenshots | Yes | Yes |
| Web optimization | Excellent | Good |
| File size | Often smaller | Often larger |
| Best use | Modern web delivery | Graphics, screenshots & lossless images |
This table provides a general comparison. The actual file size and quality will depend on the image and compression settings.
Which Format Is Better for Website Images?
For many modern websites, WebP is a strong choice because it can provide efficient compression while supporting transparency.
However, PNG still has an important role.
A useful approach is:
Use WebP when efficient web delivery is the priority.
Use PNG when lossless image preservation or an existing PNG-based workflow is more important.
There is no need to convert every PNG automatically.
What About Image Quality?
When comparing formats, don't look only at the file size.
Open both versions and compare them visually.
Look for:
- Blurry details
- Compression artifacts
- Jagged edges
- Changes around transparent areas
- Text clarity
- Color differences
- Fine details in photographs
A smaller image is useful only when its visual quality remains appropriate for its purpose.
Should You Compress WebP Images?
Yes.
Choosing WebP doesn't mean the image is automatically optimized.
A WebP image can still be unnecessarily large if:
- Its dimensions are too large.
- The quality setting is unnecessarily high.
- The image contains unnecessary detail.
- It hasn't been optimized for its actual display size.
You can use the SizeHex Image Compressor to further reduce the file size of supported images.
A useful workflow is:
Resize → Convert → Compress → Check Quality
What If You Start With a PNG?
If you already have a PNG image, don't immediately delete the original after converting it.
Instead:
- Keep the original PNG.
- Create a WebP version.
- Compare both files.
- Check transparency and visual quality.
- Compare file sizes.
- Use the version that best fits your website.
You can convert supported images using the SizeHex Image Converter.
For a WebP-specific workflow, use the SizeHex WebP Converter.
Don't Forget Image Dimensions
Format optimization works best when the image dimensions are also appropriate.
For example, converting a 4000 × 3000 PNG to WebP may reduce the file size, but the resulting image could still be unnecessarily large if your website displays it at only 800 × 600 pixels.
Resize the image when appropriate before final optimization.
The SizeHex Image Resizer can be used when you need specific pixel dimensions.
For more information about image dimensions and their relationship with website performance and layout stability, read the SizeHex Image Dimensions SEO Guide.
Common WebP and PNG Mistakes
1. Converting Everything to WebP
WebP is useful, but conversion should have a purpose.
If a PNG is already appropriately sized and optimized, converting it may provide little practical benefit.
2. Ignoring Transparency
Always check transparent areas after conversion.
Edges around logos, icons, and cut-out objects should remain clean.
3. Keeping Oversized Dimensions
A smaller file format doesn't fix unnecessarily large pixel dimensions.
Resize images when their original dimensions are much larger than their intended display size.
4. Compressing Too Aggressively
Very aggressive compression can create visible artifacts.
Always check the final result before publishing.
5. Deleting the Original
Keep your original source image.
You may need it later to create another version for a different platform, dimension, or format.
Related SizeHex Tools
If you're working with WebP and PNG images, these SizeHex tools can help with the complete workflow:
Convert images to WebP:
SizeHex WebP Converter
Convert between supported image formats:
SizeHex Image Converter
Resize images:
SizeHex Image Resizer
Compress images:
SizeHex Image Compressor
Crop images before optimization:
SizeHex Image Crop Tool
Final Recommendation
If you're optimizing images for a modern website, WebP is often a strong starting point, especially for photographs and other web content where reducing file size is important.
PNG remains an excellent option for lossless graphics, screenshots, logos, and images where preserving exact image information is important.
The best approach is not:
“Always use WebP.”
Instead, use:
“Choose the format that provides the right combination of quality, dimensions, compatibility, and file size for the specific image.”
For most image optimization workflows, follow this simple process:
Choose the purpose → Crop if necessary → Resize → Compare WebP and PNG → Compress → Check quality → Publish.
That approach gives you much more control over your website images and helps avoid unnecessarily large files without sacrificing the visual quality users actually need.